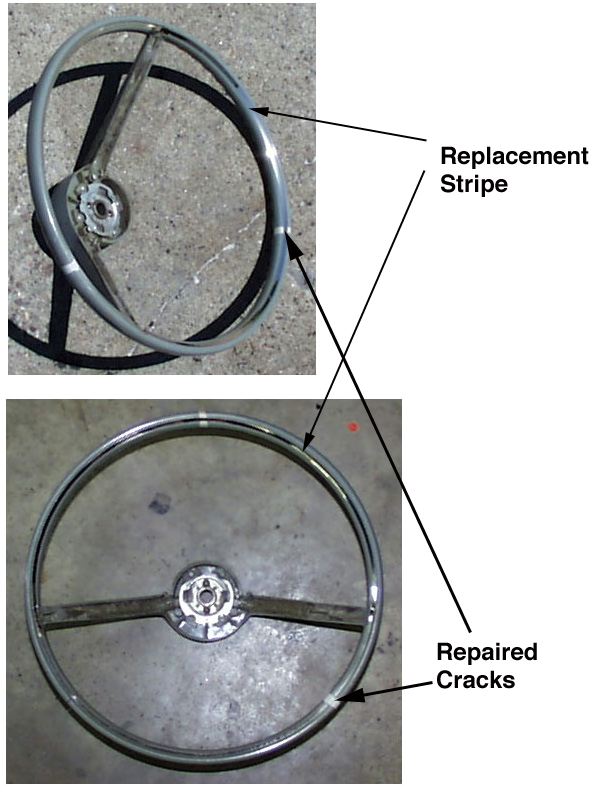
Below are two photos of a 64-66 style steering wheel that has had 2 cracks repaired but not yet painted. This was done to show the technique I use to repair these cracks. To repair the cracks in the wheel I "V"d them out with a grinder (dremel, file etc. whatever you have). For filler I use the hand workable two part epoxy putty sold by Por-15 company. and just worked some of it into the crack all around and sort of smoothed it out. Leaving it set a couple days gave me a really solid substance that is workable with sandpaper and file and grinders. I shaped it with 36 grit then used 100 grit to finish the shaping. I then wet sanded it with 320 grit. I think that from here you can use a primer for plastics and regular acrylic emamel paint to finish out the job just as you would anything else. (If you have lots of tiny cracks in your wheel, check with me to see if I can get you a replacement that is good.) Also, if the response is good I may start repairing these and turning them around on an exchange basis or just repairing yours as the come in. However I am not ready for this right yet.
However the reason for the photos is to show the replacement strip I have for the chrome trim that runs all around the face of the rim of the wheel. You can see that it is bright chrome (not silver paint). It is a mylar strip with a clear vinyl coating to protect it. It has an adhesive back so it will adhere well to a nicely cleaned surface. I cut them in the exact shape of the wheel so that there will not be any stress in the material when applied. This means it will not want to pull up due to heat or any other cause.The material is made by 3M and is used in the sign industry so it is a high quality product and should stand up well under all circumstances in these cars.
The strip comes in two sections, each half circle is actually larger than half of the wheel so that the splits will be hidden under the ends of the horn switch pieces of chrome. You can apply this strip without removing the steering wheel by just removing the center hub (twisting it about one third turn will release it), and then removing the screws holding the horn switch assembly. If you have all of your old strip still intact you can apply this strip right over the old one and have an exact cover-up giving a new look with the original raised strip. However if some of your original strip is gone, you will need to remove the rest of it, as the replacement strip is just a thin strip and not thick like the original. Then you must scrub the wheel with some wax and grease remover (bug and tar remover will also work). If you have an original steering wheel and not painted you may want to use some paint thinner to clean it. The cleaning is critical. The surface must be super clean and dry. If you have used Armor All on your interior, scrub with wax and grease remover VERY THOROUGHLY. If you do not get it clean the strip will not adhere properly. This is critical.
Prior to doing anything, remove all the excess material from the sheet with the stripes on it. you will have to be careful so as to leave the stripes on the backing paper during the removal of the excess. I suggest cutting the two halves apart to make the pieces more manageable. Now you can just peel the strip partially off the backing paper and start applying one end and working your way around pressing it on as you go. It is good to have someone to give you a hand just in case you need something held as you go. One point to remember that is also critical--DO NOT STRETCH THIS STRIPE MATERIAL WHEN APPLYING AS YOU WILL HAVE A TENSION BUILD-UP CAUSING THE STRIPE TO LIFT AFTER TIME. Just apply without pulling on it and make sure to press it down very well as you go. The adhesive is pressure sensitive so the better you press it down the better it will adhere to the wheel.
(To Order see below)
Ordering the Steering Wheel Stripe Kit:
Price is $25.00 plus shipping. Due to the size it will have to be shipped in a mailing tube. I will ship Priority Mail whenever possible so shipping will be $7.00 anywhere in the continental US. Other areas will vary so please contact me by email for details. Or give me a phone call during business hours.
I have had very good response from all my customers in the past in payment for stuff I send them. My Dad taught me that I should operate my business on trust. He always trusted that if he took good care of his customers they would take care of him in return. I therefore trust that if I take care of you and send you merchandise you will take care of me by sending the money owed for that merchandise in a timely manner. As long as this system works I will continue to operate under those guidlines.
So, if you will put a check in the mail and then email me that you have done so, sending me your shipping instructions, I will put the merchandise in the mail the same day I get your email. (some days this may take a longer due to holidays etc.)
Contact Me at :
Thunderbird Ranch
7158 Highway B
Pittsville, WI 54466
phone--715-884-6546 ( 9 to 9 central time US)